Thursday, March 31, 2011

Lumberjack Local

Wednesday found me on the road to Bagley, with very little likelihood of seeing much in the way of rail action for a couple of days. I had a full day to do in Bagley, and another full day on Thursday in Fosston. Since Mrs. L4T was away from home over night, I decided to stay in the area to save a little driving and see what I could see.

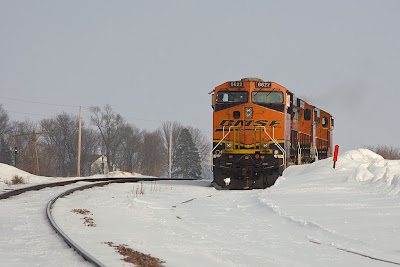
When I finished up with Wedensday's work I headed to Bemidji in the hopes that MN Chris would be able to slip away from work for a bit to give a guided tour of the model railroad club layout in town. Before I called him, the plan was to stop at the library to finish up the day's paperwork. There was one quick stop to make even before that, and when I was standing next to my car, sure enough, I heard a train horn. Seeing as how the depot was only a couple of blocks away, a swing by seemed appropriate. Once again, luck was with me as the Cass Lake local accelerated by the depot on the way home.


Unbelievably, this was the second daylight train I had seen on the Lakes Sub that day. While in a meeting in Bagley, another westbound had sounded off for the Highway 92 crossing and a quick run to the window (which always entertains those folks I'm working with) revealed what Chris later told me was likely a SUPMIN train with limestone hoppers on the head end. Sadly, no photos of the one.

Chris and I were able to find time for supper and a stop at the club. They have a nice space and a layout that you can tell is getting attention. It was a special treat to be able to take a long ethanol train for a spin around the layout behind a couple of finely detailed (with extremely customized lighting) ACe's. Thanks, Chris! And NICE train!

It's always fun to catch a train away from your normal stomping grounds, and the BNSF was kind to me this week.

Tuesday, March 29, 2011

What a Way to Start the Day

What might you see when you look for trains passing through Wadena? This:


Yesterday morning I was bound for Eagle Bend. It seemed like a quick trip uptown for some kind of gas station breakfast would be a good idea, so I grabbed the camera and made the short detour north before heading back south on Highway 71. Wonder of wonders, a glance to the west as I crossed the tracks revealed a headlight. I quickly swung into Orton's lot and unlimbered the camera. Another shot as the train approached, much slower than the Builder normally passed through Wadena:


With a train "in the bag" for the day, I was able to dream about what the GN line towards Sauk Center used to look like, back in the days when the tracks connected the hamlets of Hewitt, and Bertha, and Eagle Bend, among others, to more significant population centers further on down the line. It was a pleasant trip.

Sunday, March 27, 2011

Can't Get it Out of My Head

I've been humming that old song by the Electric Light Orchestra for a while. It's probably due to the magnetic draw of the beautiful blue skies we have enjoyed for a few days-even if you try to avoid it, the railfan bug keeps coming back. Mrs. L4T and I finally broke down yesterday and made the trip to Staples to investigate what the BNSF might be up to on a lovely late Sunday afternoon.

The railroad was kind enough to send a few westbounds our way during our time along the tracks. Before reaching Staples a headlight announced the arrival of one of the MAC's with flashing ditchlights. He was heading up a long manifest train, with a green Dash-2 providing the other end of a GE sandwich, as seen here:


We suspected another westbound, so stopped at the crossing in Staples to wait a bit prior to eating. This turned out to be a good decision, as Mrs. L4T told me she thought she could hear something. Darned if she wasn't right-I had planned to stand on the yard lead (in the crossing) to shoot this train, but that plot was foiled when he showed up running on the wrong main and I backed off so as not to upset the crew. Still got a nice look at what the H1 paint job is supposed to look like-and this one looks many times better than most of the newer engines running around.


Leaving the parking lot after chicken at the DQ, we decided to make a trip to Motley and back. Nothing was doing along the Brainerd Sub, but it turned out to be a good move anyway as another westbound stacker was visible across the lake as we came back to Staples, giving another chance at a shot. This time we picked Aldrich, and came away with this:


While we were waiting for the above train to arrive, an eastbound cleared a 308 warrant at Wadena and I decided to wait and shoot him as well. His headlight swung into view just as the tail end of the train above cleared the curve west of Aldrich, so it was a short wait until the 5268 showed up.


And then it was back to Wadena. It was a fun outing, especially seeing the sun in a location that was somewhat conducive to photography. As sure as another train on the Staples Sub, summer is coming-and I can't get it out of my head.

Saturday, March 26, 2011

A Railroad is Born

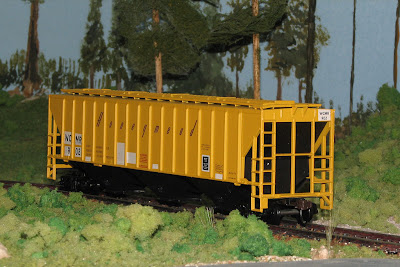
Today, something called the West Central Minnesota Railroad became a reality. The WCMR patched their first car, a 54' covered hopper formerly leased to the Honeymead Company of Mankato, MN. The railroad envisions a fleet of covered hoppers that will be used to provide dependable service to a number of on-line customers.

To celebrate this occasion, WCMR 902 was set out at the end of the yard (between BNSF trains, of course) and many photos were taken. The mechanical department understands that these "patch" jobs will get easier with time, but they are justifiably proud of the work done on this first car.


If things go as planned, the WCMR will end up with a colorful fleet, as many of the second hand cars they intend to acquire were nicely decorated by their previous owner or lessor. The caveat about plans being made so as to be broken applies, however.

As information for other aspiring short-line railroad owners or folks looking to make a fortune in car-hire fees, WCMR mechanical would like to offer some tips. First, prior patching attempts using white decal film and an inkjet printer were not successful. The acquisition of a laser printer was instrumental to the success of this venture. Second, when you get your laser printer, don't use the "transparency" setting. Use the "plain paper" setting. As soon as the decals have printed, a good coat of clear gloss spray paint, along with a second coat 10 or 15 minutes later, make all the difference in decal durability. Once the clear gloss has dried, treat them like any other decal, with the exception that you need to be very careful with the solvaset or whatever decal setting solution you use. As in, don't even open the bottle. Take our word for it.

To answer anticipated questions about why the car is numbered 902, rather than 900 or 901, the CEO released the following statement: "902 is a lucky number, or hopefully will be some day. I've been playing the lottery using some combination of these numbers for years, and expect a big payday any day now. Numbering our first car 902 can only improve those odds!"

We look forward to seeing other attempts at "patching" equipment from various operators. The future is bright-make sure you have enough equipment to serve your customers!

Another Oddity

For the last 3 years or so, by my estimation, BNSF has been running coal trains powered exclusively by AC motors. Coal trains run through Wadena with some combination of SD70MAC, SD70ACe, and ES44AC tugging and shoving. While DC engines were common on coal when I moved to the area 6 or 7 years ago they are now gone, sentenced to a life of manifest freight, intermodal, and grain and tank unit trains.

Since this seems like such an ironclad rule, of course there has to be an exception. That's just what I found last Tuesday morning on my way through Staples. A loaded coal train was posed in the yard with a MAC up front and a Dash 9 as the second unit. I just had to turn around, go back, and take a picture.


This oddity got me to thinking about another similar oddity from a couple of years ago. Mrs. L4T and I were taking in the sights of the Powder River Basin when the BNSF tossed another oddity our way-and that time, the DC motor GE was shoving as a DPU. You can see a photo in this post.

Another oddity of the day was the fact that although I followed the Staples Sub to Becker and spent the evening in Red Wing, this was the only train I shot all day. So it was a double oddity day!

Monday, March 21, 2011

Central Minnesota Gloom

It hardly seems fair that on the same weekend a couple of OMR members are out shooting trains in glorious sunshine and spectacular scenery, the rest of us were stuck under leaden skies. But it's the truth.

So it came to pass that Mrs. L4T and I made a short chase through a gloom to catch the DPU of a coal empty as it blasted west on Sunday evening. We had planned on heading to Verndale for supper, but the presence of the empty coal train passing through Wadena was enough to lead us astray for a bit. I managed to catch up to him at CR 143, just west of Bluffton, where I grabbed a shot of the trailing unit as it was swallowed up by the fog.


And that was the sum total of my prototype railfanning last weekend. Not much, but a little train action sure beats none at all. And I have to admit to spending a bunch of time over the weekend in the basement, where the sun shines on the trains at my command, not someone else's.

Next time, I'll hopefully have uploaded the shot of a Dash 9 on a coal train in
Staples yard, which was today's sighting. There's that to look forward to, at least.

The Hazards of an Airbrush

Airbrush + compressor + paint. What could possibly go wrong? A couple of things, as it turns out.

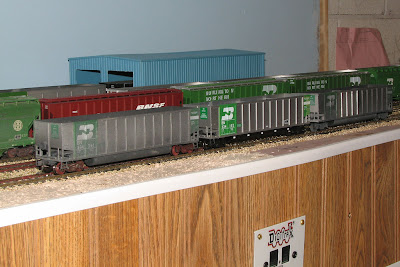
The main thing is know when to say when. As you'll see in the photos, airbrushing is so much fun that I tend to keep doing it long after I should have stopped. Consequently, I am now the proud owner of a couple of very weathered BN bethgons. You can see how much I put on when you compare them to the unweathered car in the middle.


On the plus side, the airbrush did exactly what it was told to do. That's a good thing, since that should make the next step easier-control myself.

If you are going to weather cars, do yourself a favor. Go stand along the tracks and take a close look at what prototype equipment actually looks like. It's nowhere near as filthy as what I tend to imagine. There's less rust, too, although that's not a big factor with these aluminum cars.

Another tip-weather with the trucks and wheels mounted on the car, or at least use the same process to weather them as you do the carbody. If you don't you'll likely end up with something like the closest car in the photo above-the trucks and wheels are grossly different than the car itself.

I tried one other trick as well-simulate the repair of a few of the panels on one of the cars, which is something that you occasionally see when you are out along the tracks. Again, not perfect, but hey, you never learn if you don't make a few mistakes, right?


Anyway, that's my first attempt at weathering coal gons, and I expect to get better at it with practice. After all, there are still 40 or 45 to go.

I gotta say, it's fun! If you haven't tried weathering, get after it. You can't do any worse than me.

Saturday, March 19, 2011

Bending the Iron at 1/87th Scale

Toy train sets generally come with an oval of track. Manufacturers of these sets know that one of the first things beginning modelers will want to do is add variety to their budding layouts, thus the scale turnout was born. Along with these scale turnouts came the need to control them, either manually or using some powered apparatus. Solutions to this problem as diverse as the Tortoise, the twin coil switch machine, and the ground throw quickly evolved.

In addition to the above, there have been a huge number of roll-you-own solutions to the problem of "bending the iron". Examples include automotive choke cables and RC model airplane linkages. One thing that all the above have in common, though, is they cost money-in many cases, as much or more than the turnout itself, and the turnouts aren't cheap to start with. So began my quest to figure out how to control the turnouts in my basement-without spending an arm and a leg doing it.

My first attempt was using the least expensive option listed above, the Caboose Industries ground throw. In addition to cost, these have the advantage of looking something like the actual mechanism used to control a prototype switch that is thrown by hand. They are grossly overscale, though. But the big problem I found in using them was the need to sometimes reach behind cars and operate them, without being able to see them. This led to occasional derailments and general frustration during what was supposed to be an enjoyable time. So the search for a "better way" began.

Regular readers know that I'm a tightwad, so one of the requirements for whatever I came up with was that it was affordable. Second was reliability-the proper solution would apply force to the points to hold them where they were supposed to be in order to minimize derailments and electrical problems. Third, the solution needed to have the capability of being operated from the fascia, to avoid the problems posed by the ground throws. In addition to these criteria, it would also be nice if there was a way to determine the position of the points from a distance. Shouldn't be so hard, should it?

In the end, no. But I did go through some experimentation before arriving at what I think is a rather elegant solution. My first attempts at converting rotary motion to linear motion and applying the result to the points was not consistently successful, so I came up with a push rod system that worked pretty well, but could use help in holding the points in position every time, and didn't offer an easy way to indicate the route selected. Back to the drawing board. Eventually, I came up with this:


What's needed to make this work? Well, for each turnout I use about 6" of piano wire from the hardware store, a few inches of 5/16" dowel, a wooden wheel that fits the dowel, some 30# test black fishing line, a couple of scraps of wood (a few inches of 1 x 2 and a short piece of lath), an eye screw, and a few wood screws. Material cost is well under a dollar a turnout. (NOTE: the wire I use is really springy wire, not something that is easily bent. You can poke this wire through your finger! It will bleed! Be careful with it. This HAS to be really springy, "music" or "piano" wire, not any old soft wire you have. If you can bend it without really trying hard, it probaly won't work.) Tools needed include a drill bit to make a hole in the foam layout base, needle nose pliers, a coupld of small drill bits for pilot holes and holes in the dowel, a 5/16" bit, and a heavy duty wire cutter for the piano wire. Wear safety glasses when you cut it! I've also used a bit of craft paint on the dowel to indicate turnout position-green up is normal, and red up is diverging.

So how does it work? Rather than try to explain, I'll present the following video:


It took a few tries to get the hang of installing these, but once you figure out the geometry, you can move right along. I can now install one in less than an hour, from the time I decide to get out the tools until it's painted. And it is an enjoyable hour. I will warn you that when you trim the piece of the spring that protudes through the top of the throw bar, be sure to wear eye protection as cutoff segment will want to go flying.

All in all, I'm really please with the way these work. They meet all the requirements I mentioned above and the best part is, it's something I made with my own hands. I solved a problem!

Friday, March 18, 2011

Airbrush Adventures

I've long admired some of the work done on model railroad equipment by modelers using airbrushes. A couple of years ago I bought a cheap Testor's single action airbrush, and it seemed to work OK if you wanted to apply a solid coat of a color, but for things like weathering it left much to be desired.

MN Chris suggested I try an internal mix model put out by Harbor Freight, and I finally worked up the courage to order one.


After receiving it a few days ago and finding some hose that would work to hook it up to my compressor, I filled the jar with water and tryed spraying. It worked great!

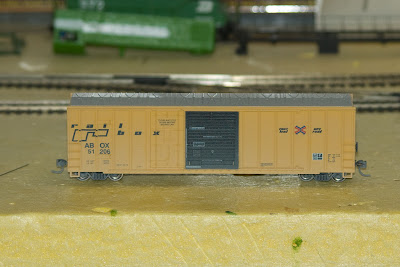
The next evening I decided to follow some advice I had read on the net and take it apart so I would know how to disassemble and assemble it for cleaning. After a few minutes spent with a pile of parts, I finally managed to get everything back together and working. Mixing up a special blend of Ceramcoat Ivory and blue windshield washer fluid (my mix is about 4 parts WW fluid to one part paint), I set to work to dull down a shiny new Railbox car. Here's the untouched side:


After a few passes with the airbrush, the "plasticy" shine is gone, and I've got a start toward weathering the car:


A little web snooping revealed a page that contains an in-depth review of the airbrush, along with some tips for using it. Actually, Don Wheeler's entire site is a treasure trove of info for the new airbrush devotee.

So far I'm very happy with the purchase. I see the airbrush is on sale for $14.99 currently, and I have no qualms about recomending it to anyone who thinks they may need one. My copy is not perfect, as the color cup won't seat properly in the holder so I'm limited to using the jar, but I plan on picking up a new cup when I get the chance. It seems to spray cheap acrylic craft paint very nicely when it's properly thinned.

There's a lot to learn about airbrushes, but I think this one is getting me started in the proper direction.

Sunday, March 13, 2011

Snowy Southwest Minnesota

So last week, I had to make a trip to the Tyler and New Ulm areas. I was hopeful about catching a little DME or Marshall Sub action, but came away with little to show from a railfanning perspective, although I was suitably impressed with the massive snowdrifts that were everywhere. They have much more snow on the ground than central MN, with the amount increasing as you travel south and west.

I followed the Marshall Sub from Willmar all the way to the DME crossing near Highway 14, but a section crew replacing a rail near Raymond kind of dashed any hopes of BNSF trains for the day. This was a disappointment as the section south of Marshall is one of my favorite sections of railroad in the state. Then, to add insult to injury, the DME ran a train through Tyler just as the meeting I was there for started. After that appointment was complete, I headed for New Ulm. The blue and yellow railroad doesn't really parallel the highway for a lot of the way. I swung into Tracy to see if I could repeat Jer's catch of the pride of the DME but had no luck. However, when I passed through Springfield, I was greeted by the sight of a BNSF shuttle train sitting at the massive elevator there. I grabbed a shot in the fog. This is a massive elevator that loads many trains, and I've heard they have the ability to store 10 million bushels of corn. I know they can load trains fast, as I was lucky enough to stumble across one loading three years ago. Today everything was quiet, as I think the train was waiting for a crew to take it west to the BNSF connection at Florence.


On my way to the office in New Ulm the next morning a swing by the yard caught a set of GP40's sitting in front of the depot. It's always neat to shoot some trains out the car window.


When I finished up in New Ulm, I had to run back to Tyler for another meeting. The train in Springfield was gone, but now there was a different power set sitting at Lamberton. I'm not sure what the purpose was, as there was what looked like a complete grain train and a complete ethanol train sitting near the Highwater Ethanol plant just west of that burg. Again, no action at the elevator. The neat thing, that I didn't even notice until I uploaded the pictures, was the ES44C4 on the head end of this power set. First one I've seen in a while.


The only trains I saw the next day were at Perry's Hobbies in Morgan, where I managed to convince myself to invest in an Exact Rail MDW boxcar, an Intermountain covered hopper, and a set of Walthers Bethgons for the stunningly low price of $59 plus change. And, no shipping fee!

A stop in Bird Island revealed no TCW action, nor was the CP doing anything when I went through Belgrade. So trainwise, it was a quiet week. That's all!

Sunshine! And Trains, Too!

After what has seemed an interminable cloudy and overcast period, the sun finally came out in Wadena this afternoon. Since Mrs. L4T and I were planning on a little ride and supper, we decided to hit up the Staples DQ and see if the BNSF was up to anything.

Crossing Highway 10 in Wadena, we spotted a headlight to the east. An empty coal train was waiting on Main 1. I shot him from a distance and continued east, figuring that a zipper would should up to overtake him on Main 2 before crossing over at Wadena.

Instead, the next train was another coal empty sitting at Oink Joint Road. Once again I took the chance for a nicely lit shot, and this one is worth sharing. Of course it would be even nicer with a nose logo on the leader.


It is so nice that the sun is coming back toward the north. Finally, some nose light.

We continued on to Staples, and checked out a number of trains in the yard, but took no photos. I noticed at least one each loaded and empty coal train along with what looked to be a manifest. Then it was off to DQ for supper.

Just as we approached the depot after supper the rear end of a westbound pig train was passing the depot. I figured this for the zipper that would pass the coal empties spotted earlier, and formulated a plan to shoot him west of Wadena, but rapidly pulled ahead of the train. By the time we made Verndale he wasn't visible in the mirror. Then the plan changed again. An eastbound worm train was passing through the sag. With two units up front I guessed there would be a DPU, and was lucky to find it facing the sun. So I sprinted to the other side of the crossing as the train passed to shoot this:


If you click on the photo to view the larger image, you might be able to make out the headlight of the pig train. It wasn't moving anymore. So a u-turn and visit to Verndale was in order, where I managed to get a shot from a good sized snowpile. The third unit is a warbonnet SD75.


He had to stop, as the two coal empties we had spotted on the way to Staples were still sitting there. Seemed to be the evening of snowpiles, as I found another one to shoot the first coal empty as he waited at the CTC signals in Wadena. The power was a matched set of GE's.


I like the way this shot catches some of the industrial trackage in Wadena. The siding that takes off to the right is the K line, which ends a few hundred yards further south but serves Drywall Supply and is a candidate to be extended to the new fertilizer plant that has been built in the Industrial Park on the south edge of town. The line that comes toward you is only used for MOW equipment when the crews are in town, but used to be the siding for the Peterson-Biddick elevator that was razed this winter.

So we managed to get out and see some trains in the sun, and enjoy some DQ food. Not a bad way to spend late Sunday afternoon. Hopefully this will become more common as the weather turns.

Sunday, March 6, 2011

Winter Railfanning Blues

I just realized that the only current prototype photos I have posted in well over a month were of the F59-led Builder on February 26. My bad. While I have been spending lots of time working on models, I still manage to get out of the house occasionaly, and once in a while have a chance to shoot some train pictures.

Most of the pictures are under heavy overcast, so that's one reason it's been hard to get motivated to go out and stand in the cold. But one thing that overcomes even the clouds is the opportunity to spend time with other fans. On February 5th, news of a late #7 got the boys out in force. Mrs. L4T and I decided to head on over Hawley way and check in with them. Luckily we were there for the passage of the Amtrak train, including a very unusual unit third out.


There's a good chance that the train was covered with frozen foam when it stopped in Fargo.


A short wait yielded one more westbound, this time coal empties led by MAC's. This is a great place to railfan.


And with those two trains in the bag, Mrs. L4T and I headed for home. We were able to catch one more coal empty as it approached the Highway 10 overpass between Perham and New York Mills. This time a GE was doing the honors.


February 22, I had to make a trip to Staples, and was pleased to find this consist sitting at the west end of the Staples yard. Once again, the lighting was crappy, but how could you resist a set like this?


And finally, the next day I passed an eastbound just outside St. Cloud and decided to shoot him at the MP 66 crossover. A manifest train with a couple of EMD's in the consist, this was was tossing the snow along the right of way into the air.


There you have it. Not a lot to choose from, but I needed to get some of these posted just to maintain any railfanning cred. Hopefully I'll get a few better shots next week when I head to the land of blue and yellow.

Tuesday, March 1, 2011

Going Loco(Net)


Having come home from the World's Greatest Hobby show in St. Paul this winter with a shiny new Digitrax Zephyr Xtra and UT4 throttle, the age of DCC has settled over Casa Del L4T. MN Chris has been a great help as I learn new things about model railroading, especially with decoder installs that are currently above and beyond my modest ability.

One of the things I wanted to do was start to install remote "plug ins" for the UT 4 so I could follow my train around the layout. Someday I hope to have a fancy DT402D duplex radio throttle and associated receiver but for now I'm stuck in the plug in age. Hence the need for more ports to connect the throttle.

Sniffing around the internet revealed Railway Bob's site, where the deepest darkest secrets of the Digitrax "LocoNet" are discussed. Digitrax makes it easy to build a LocoNet using RJ12 phone cables and the UP5 panel. Here's a photo of the single UP5 I brought home with me, installed on the layout.


This view from underneath the layout shows how easy these panels are to connect-the LocoNet simply plugs in using an RJ12 cable, and you daisy chain it on to the next device using another cable.


However, the UP5's run in the $15 to $20 each range, and I wanted to be able to use my throttle in at least half a dozen places. Surely, I thought, there must a better cheaper way. And so I arrived at Railway Bob's idea of using RJ12 phone jacks.

Now the thing to remember is RJ12 means 6 wires. When you get to the store and start looking at merchandise you'll find that there are lots of phone jacks, but the great majority are RJ11. These have the same physical configuration as RJ12 jacks, but only the center 4 slots are populated with connectors. So they won't work for a proper LocoNet. But if you are persistent, you'll come across some RJ12 jacks, and with any luck they'll be on clearance. That's what happened to me. Twice. So I scooped up a bunch of them, along with some 6 conductor phone cable, and retreated to the basement. And after a little time with a borrowed crimper, a healthy dose of blue wire nuts, and some finaggling, I ended up with a working LocoNet. Here's my first home brewed panel, from the front:


And here's what one of them looks like from behind:
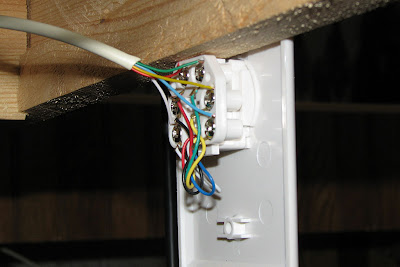

I know they're not as neat as the UP5's, but you have to remember we are talking about a near 90% price discount. And all you have to do is connect white to white, blue to blue, red to red, etc. Not too tough. Railway Bob's info is a big help here. I do have one extra tip that I didn't see on his page-if possible, use solid 6 conductor wire. The flat cable with stranded conductors is MUCH more difficult to work with. I've done it both ways, and the difference is night and day. Using the solid rather than stranded conductors makes that much difference.

When I installed the UP5 shown above, I needed to "tap into" the phone cable I had already run to my first panel. With a good supply of wire nuts on hand, I decided to try splicing into the existing run using them. (Hint: if you are color blind, get some help while making these connections. Color matters!) It took a while to strip all 18 wires and get them arranged, but once the task was done the splice looked like this:


Most important of all, it worked!

I don't have all my fascia installed, so some of the panels are installed temporarily, as seen here:


If you're a Digitrax user, and interested in building out a LocoNet without spending enough money to buy a locomotive, I'd encourage you to consider using off-the-shelf RJ12 modular plugs and 6 conductor phone cord. It's worked great for me so far (I'm up to 6 locations without a problem) and it saves a substantial amount of money. You don't need much in the way of tools, and it's fun, like model railroading supposed to be. Why not try it?