Showing posts with label big horn sub. Show all posts

Wednesday, April 11, 2018

The Trials and Tribulations of Crossing the Tracks in Parkman, Wyoming

My Big Horn Sub layout models some of the BNSF mileage between Sheridan and Parkman, Wyoming. One of the modeled locations is the siding at Parkman, which is the summit of Parkman Hill and the point where helpers will cut off to return to Sheridan and await the next westbound train needing help.

An overpass at Parkman allows access to both sides of the railroad. If you search for photos taken at Parkman, you will find that this overpass is frequently used by railfans to capture images of trains passing by.

It seemed that my layout needed a miniature version of this overpass. After a perfunctory search of the internet I was not successful in finding any good pictures of the bridge. As a result I decided to try modeling one of the wooden bridges at Hawley, MN since I did have a photo of this taken a few years ago that would give me something to work from.
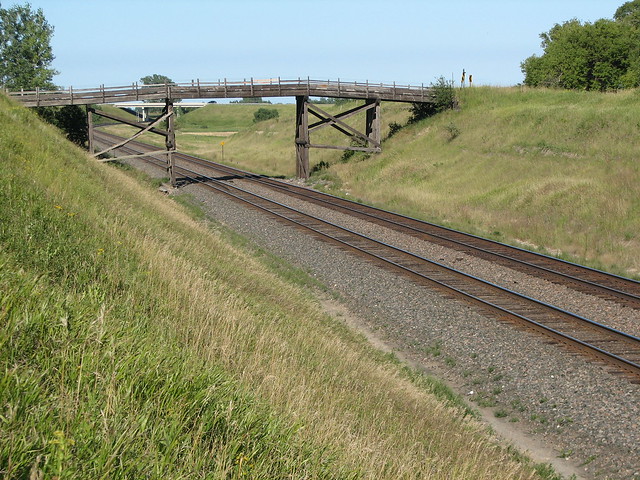
East Wooden Bridge at Hawley
Wrong state, wrong bridge!

After posting a picture of what I was up to on Facebook, I noticed a comment from Chris Atkins, who is also modeling this section of railroad (plus a lot more!) asking if I intended to model the bridge at Parkman. When I answered yes, he offered up numerous photos of the bridge which revealed a lot of detail, including these found on bridgehunter. Turns out my attempt to use the bridge at Hawley as a prototype was way off base.

You're doing it wrong

The bridge at Parkman is not only completely different, it is more interesting as it contains a pony truss and railroad rails as part of the support elements. Perhaps the most striking difference, to my eye, is clear in this photo. Rather than three straight sections with angled transitions between them, this bridge looks to have a more gradual curving line up and over the tracks. Which presented a problem from the modeling perspective, as in how do I create this gradual curve when all I have to work with is straight pieces of miniature lumber?

So I sat down to think. And ponder. And after extensive contemplation, I came up with the idea of soaking the tiny timbers in hot water followed by a drying session in a jig that held them in the bent position. Here are the main timbers in the jig as they dry.

Got carried away with the paintbrushes

And here are the results after drying overnight. The curve held well when removed from the jig!


In fact, it looks like my first attempt may have been bent too much. I certainly didn't expect that, but with this square timber priced at 79 cents at Hobby Lobby, I guess I can make an adjustment to the jig and try again.


After reviewing the scene, it's clear that I need to make the fill on each side of the bridge have more gradual slopes. So it will be back to the drawing board when I get time to work on the layout again.

Finally, one more shout out to Chris Atkins. Without his help I would still be trying to jam west-central Minnesota into Wyoming. Thanks again, Chris, the photos and assistance are greatly appreciated!

Monday, May 23, 2016

Incremental Improvement

Sometimes progress comes in great leaps, and other times (likely usually) it comes in tiny, nearly undetectable nudges in the right direction. Last night the progress fairy visited me and dropped a helping of the latter. 

As part of my layout reconstruction, I have spent the last few weeks working on a staging yard. Now since this will be just below the operating level of the layout, it needs to be complete before I can take another step. That means not just track laid, but also switch controllers and feeders installed, track joints soldered, and enough trains run through to prove the trackwork is good, as it won't be easy to access once the top deck is in place. 

The track is all down, and the switch ladders are built, so I have set to putting in the classic electrical box controllers. Below is a view of one that I pulled off the old layout. Now understand, these are the best solution to controlling turnouts I have stumbled upon. I drill a hole through a dowel, push the free end of the wire through the hole, and bend the wire to hold it in place. But there is still room for improvement. I got to thinking. Never a good thing. 


Below is a view of the bronze wire I have used to engage the throwbar on the turnout and the handle of the switch in the past. One of the issues this poses is there is nothing to resist lateral force that can make the wire move sideways, and in extreme cases even disengage from the throwbar as it drops down. This is generally known as a bad thing. Takes lots of fiddling to get it back in place.


So I sat and I thought...how can I make this work better. And I had a light bulb moment. The result of this revelation is below. Two extra bends create a situation where the wire is restrained from moving in one direction laterally, and after the dowels that operate the switches are installed, it won't be able to move in either direction. Eureka, I said!


So here is what the new assembly looks like after everything is put together, ready to install under the layout. Not much of a change, but it makes a significant difference in the stability of the whole thing. Notice that I tightened up the spacing between the vertical portion of the wire and the side of the switch as well. This was partly due to a dandy little pair of pliers I scored for four bits at a rummage sale, with jaws just the right width to make this bend.


Mr. L4T is a happy camper!

Now for those who have read this far, a bonus pro tip. I used to struggle mightily getting the screws into holes in the junction box while holding everything in place. The I said, forget the holes and just drive a screw THROUGH the jbox and into the plywood. Turns out this is much easier, on the patience supply and the spine. Eureka, I said again!

Ain't progress grand?